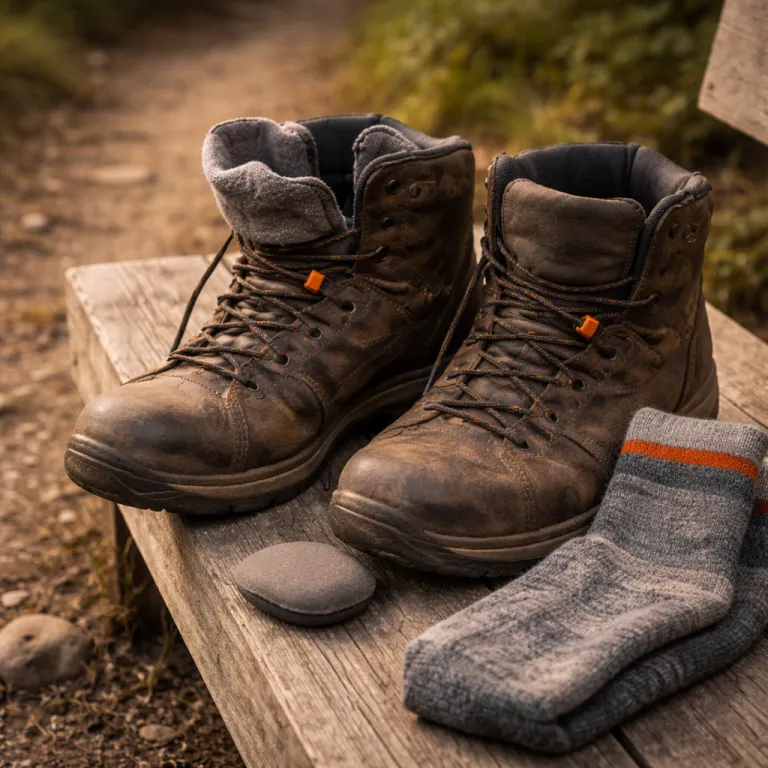
How much heel slip is normal in hiking boots ?
Heel slip in hiking boots is not always a defect. A small heel lift of about 3 to 5 millimetres on a steep climb is normal and often means the boot flexes correctly under your foot. When that lift grows toward 1 centimetre on flat ground, the heel slippage becomes a fit failure that no amount of wishful thinking will fix.
Start by measuring the heel lift instead of just feeling annoyed about the slipping. Stand in your hiking boots on level floor, lace them as you usually would, then have a partner slide a thin ruler or folded card up behind your boot heel while you gently raise your shoe heel. If the gap between your socks and the back of the boot is closer to 1 centimetre than 3 millimetres, you are dealing with a real heel slip problem that needs a structured heel slip hiking boots fix.
Pay attention to when the heel slipping happens during a hike. If your heel only moves when you sidehill on loose rock, the boot may be fine and your lacing techniques or sock system need work. When the heel slippage shows up on easy trail, road approaches, or during a grocery run in the same shoes pair, the shoe fit or boot size is probably wrong and no anti slip gimmick will fully prevent heel movement.
Check whether the boot heel pocket actually matches your foot shape. With the laces snug, try to pinch the leather or fabric at the back of the boot; if you can grab more than about 1 centimetre of material, the heel cup volume is too big for your foot. In that case, even the best heel lock or surgeon knot will only mask the heel slip for a while before the slippage returns and hot spots flare up again.
Also look at how your toes sit in the boot relative to overall size. You want enough room in the front of the hiking boot to avoid black toenails on descents, yet not so much length that your foot swims and the slip heel problem worsens. If you bought a pair shoes online from Amazon or another retailer and sized up “just in case”, that extra half size may be the real reason your heel slipping feels unmanageable.
Lacing locks and surgeon knots that actually prevent heel lift
Most hikers jump straight to new boots when a free lacing fix would have worked great. The single most effective heel slip hiking boots fix is a surgeon knot at the instep, which changes how the boot holds your midfoot and heel. Instead of yanking the whole lace system tighter, you lock the lower section and let the upper eyelets fine tune ankle support without crushing your toes.
Here is how to tie a proper surgeon knot for hiking boots. Lace the boot normally up to the second or third pair of eyelets above the shoe heel, then wrap the lace around itself twice instead of once before feeding it into the next eyelet pair. That double wrap creates friction, so when you pull the lace up, the tension stays locked over the top of your foot and dramatically reduces heel slippage without needing to over tighten the rest of the boot lacing.
This surgeon knot method is especially powerful if your foot is low volume but your boot is built on a higher volume last. By locking the midfoot, you prevent heel movement while still allowing the toe box to stay relaxed for long hiking days. Many hikers with plantar fasciitis also report that a well placed surgeon knot improves shoe fit by stabilising the arch and reducing strain on the plantar fascia during long descents.
For even more control, combine the surgeon knot with a heel lock at the top eyelets. After you reach the last open eyelet, run each lace straight up into the next eyelet on the same side, creating a small loop, then cross the laces and thread them through the opposite loops before tying your knot. This classic heel lock focuses tension around the boot heel collar, which helps prevent heel slipping when you are edging on rock or kicking steps in spring snow.
Some modern hiking boots, such as the Salomon X Ultra and Hoka Anacapa, build partial heel lock features into their hardware with locking hooks near the ankle. If your current pair does not have those, you can still mimic the effect with careful boot lacing and a deliberate surgeon knot sequence. Before you write a frustrated review after a long read of Amazon comments, give these lacing techniques several real hikes, because a free lace tweak often outperforms expensive heel pads or a rushed new shoe purchase.
When you test new lacing patterns, change only one variable at a time. Hike a familiar 8 to 10 kilometre loop, note whether the heel slip improves, then adjust the position of the surgeon knot by one eyelet if needed. This methodical approach turns vague slipping complaints into clear data about what worked great for your particular boot, foot, and terrain mix.
If you are experimenting with lacing on a women’s specific model such as the Expeditor Ridge waterproof walking boots, pay attention to how the narrower heel interacts with these knots. A precise heel lock on a sculpted women’s boot heel can almost eliminate slip heel issues, while the same tension on a unisex boot might feel harsh across the instep. The goal is always a secure shoe heel with relaxed toes, not a tourniquet around your ankle.
Managing volume with insoles, tongue pads, and boot selection
Once you have exhausted lacing tricks, the next heel slip hiking boots fix is managing internal volume. Many hikers buy a half size up to “be safe” and then fight heel slipping for the entire life of the boot. Instead of living with that, you can strategically add pads and insoles to bring the boot interior closer to your actual foot shape.
A thicker insole is often the cheapest real fix for persistent heel slippage. Models like Superfeet Green or Sole Active Wide raise your foot by about 4 to 6 millimetres, seating the shoe heel deeper into the boot heel cup and reducing the space that allows your heel to slip. This change also improves shoe fit for many people with plantar fasciitis, because the firmer arch support spreads load across the whole foot instead of letting the heel take every impact.
After insoles, tongue pads are the next precise tool. Self adhesive heel pads and tongue pads, usually sold for 5 to 8 dollars at shops like REI or any competent cobbler, let you fine tune how the boot grips the top of your foot. Place a small pad behind the tongue, roughly over the highest point of your instep, to push your foot slightly backward and prevent heel movement without needing to downsize the entire boot.
There are three tongue pad placements that consistently work in the field. First, a central pad high on the tongue helps when your foot is low volume overall but the boot is tall through the midfoot. Second, a lower pad closer to the toe crease helps when your forefoot is narrow yet the boot’s front volume is generous, which often shows up as both toe sliding and heel slipping. Third, a split pair of thinner pads on each side of the tongue can stabilise a bony foot that tends to roll inside the boot, reducing both lateral slippage and vertical heel slip.
If you are still fighting movement after insoles and pads, reassess the boot itself. A quick test is to lace the boot firmly, then try to pull your heel straight up while seated; if the boot heel lifts with your foot more than a few millimetres, the heel cup is simply too wide. At that point, no amount of anti slip tape, extra socks, or clever boot lacing will fully prevent heel slippage over a long hiking day.
When you shop for your next hiking boot, prioritise heel pocket shape over brand hype. Some lasts, like those used in many La Sportiva and Scarpa mountain boots, run narrow in the heel and snug around the ankle, which is ideal if your current shoes pair always feel loose in back. Others, including several popular Merrell and Vasque boots, offer a more relaxed heel that suits wide rear feet but can be a nightmare for narrow heel hikers who then chase every heel slip hiking boots fix on the internet.
Before you click buy on Amazon or any other retailer, read a detailed fit guide such as the one on the page about the best hiking boots for first time buyers. Look for explicit notes about heel width, midfoot volume, and whether the boot runs long or short in size. Matching your foot to the right last from the start is the most powerful way to prevent heel slipping and avoid relying on endless aftermarket pads.
Socks, two-sock systems, and tongue migration on real trails
The wrong sock can sabotage even the best lacing techniques. A thick, loose sock acts like a moving pad under your foot, encouraging slip and creating hot spots at the back of the shoe heel. A well chosen two sock system, by contrast, turns the inevitable micro movement inside hiking boots into harmless sliding between fabric layers instead of skin and boot.
The classic two sock setup uses a thin synthetic liner under a medium weight hiking sock. Brands like Injinji make liner socks that reduce friction between your toes and the boot, while Darn Tough produces durable Merino synthetic blends that cushion without adding sloppy volume. In this system, the liner sock moves slightly against the outer sock, so any heel slippage happens between textiles rather than between your foot and the boot heel.
For many hikers, this simple change is the most effective heel slip hiking boots fix. If you currently hike in a single thick cotton sock, swap to a liner plus medium Merino blend and repeat the same trail where you previously felt heel slipping. You will often find that the combination of better moisture management and controlled fabric on fabric slip heel movement dramatically reduces hot spots and blister risk.
Sock choice also interacts with plantar fasciitis and general foot fatigue. A supportive insole paired with a snug, non bunching sock helps keep the plantar fascia from overstretching on long descents, which indirectly reduces heel slippage by keeping your foot more stable. When your arch collapses inside the boot, your foot lengthens and narrows, which can loosen the shoe fit mid hike and turn a once perfect boot into a sliding mess by kilometre fifteen.
Another under rated factor is tongue migration. If the tongue of your hiking boot twists outward by the fourth kilometre, the laces stop sitting evenly over your instep and you subconsciously tighten them to compensate, which often increases pressure on the top of the foot while doing little to prevent heel movement. Boots with gusseted tongues, such as the Salomon X Ultra and Hoka Anacapa, build in structure that keeps the tongue centred and reduces this kind of slippage related discomfort.
If your current boots lack a gusseted tongue, always thread the lace through the small fabric loop on the tongue. That simple step anchors the tongue and keeps the boot lacing aligned over the midfoot, which helps your surgeon knot and heel lock do their jobs. When the tongue stays put, you can run slightly looser laces over the toes while still locking the heel, reducing both numbness and heel slippage on long hiking days.
For high volume insteps that feel crushed by tight laces, try window lacing. Skip one pair of eyelets directly over the most sensitive part of your foot, then resume normal lacing above; this creates a pressure free window while still allowing a firm heel lock higher up. Many hikers find that once the top of the foot stops screaming, they no longer over tighten the entire shoe, and the perceived heel slip largely disappears.
When to replace the boot and how to choose the next pair
Sometimes the honest answer is that the boot is wrong for your foot. If you can lace the boot as tight as you dare, use a surgeon knot and heel lock, add heel pads and a thicker insole, and still feel your heel slipping more than 5 millimetres on flat ground, the heel cup volume mismatch is simply too large. At that point, chasing one more heel slip hiking boots fix wastes time you could spend hiking in a better fitting pair.
Before you retire a boot, inspect the midsole and outsole for clues. A heavily compressed midsole under the heel, especially in softer compounds like those used in some Hoka and older Merrell models, can lower your foot deeper into the boot and change how the boot heel grips. When the cushioning collapses unevenly, your foot may tilt or slide inside the shoe, which feels like new slippage even though the original shoe fit was acceptable.
Look at the internal lining around the heel as well. If the fabric is worn smooth or torn, particularly at the back of the shoe heel, your socks have less friction to work with and heel slippage will increase no matter how clever your lacing techniques become. In that situation, even anti slip patches or extra pads are temporary fixes, because the structural grip of the hiking boot has already broken down.
When you shop for a replacement, prioritise heel pocket shape, midfoot volume, and tongue design over marketing claims about waterproof membranes. Try on multiple boots in the same size, paying attention to how the boot heel holds your foot when you walk up and down a ramp in the shop. A good fitter will encourage you to test a surgeon knot and heel lock right there, because a boot that only feels secure with painfully tight laces will not age gracefully over hundreds of kilometres.
Use your previous experience as data, not failure. If your last pair shoes from Amazon felt great in the toe box but always allowed heel slipping, look for a brand known for narrower heels and consider a slightly different size or width. Conversely, if you fought numb toes while chasing a perfect heel slip hiking boots fix, you may need a boot with more forefoot room and a better sculpted heel, rather than simply downsizing and hoping for the best.
As you refine your kit, remember that boots are only one part of a system that includes socks, insoles, and pack weight. A lighter pack, perhaps carried in a modern design like the welded waterproof models discussed in this analysis of a new ultralight backpack, reduces the force driving your heel into the back of the boot on every step. Less force means less slippage, fewer hot spots, and more margin for small imperfections in shoe fit.
In the end, the best heel slip hiking boots fix is a combination of realistic expectations, smart lacing, and honest gear assessment. A 3 millimetre lift on a steep climb is just your foot working with the boot, while a 1 centimetre lift on flat trail is a sign to change something fundamental. The trail rewards those who tune their system carefully, because comfort comes not from the first kilometre but from how your feet feel after the tenth river crossing.
FAQ
How much heel movement is acceptable in a new hiking boot ?
A small heel lift of about 3 to 5 millimetres on steep climbs is acceptable and often normal. If you feel around 1 centimetre of heel movement on flat ground, the boot is likely too big or the heel cup is too roomy. In that case, you should try lacing fixes, insoles, and pads, then consider a different boot if the slipping persists.
Will a heel lock lacing technique damage my boots or cut off circulation ?
A properly tied heel lock should not damage your boots or your feet. The technique focuses tension around the ankle collar while allowing you to keep the forefoot lacing slightly looser, which often improves comfort. If you feel numbness or tingling, back off the tension and experiment with window lacing or a lower surgeon knot position.
Can insoles really fix heel slippage, or do I need new boots ?
Thicker or more supportive insoles can reduce heel slippage by raising your foot deeper into the heel cup and improving overall stability. This works best when the boot is only slightly too roomy and the heel pocket shape is otherwise compatible with your foot. If you still have major movement after upgrading insoles and adjusting lacing, the boot’s basic fit is probably wrong.
Are two pairs of socks better than one thick sock for preventing blisters ?
For most hikers, a thin liner sock under a medium weight hiking sock is better than one thick sock. The liner allows controlled movement between fabric layers, so friction happens between socks instead of between your skin and the boot. This system also manages moisture more effectively, which further reduces blister risk.
When should I give up on a heel slip fix and replace my boots ?
If you have tried surgeon knots, heel locks, window lacing, upgraded insoles, and tongue or heel pads, yet still feel more than about 5 millimetres of heel lift on easy terrain, it is time to move on. Excessive wear in the heel lining or a visibly collapsed midsole are also strong signs that the boot has reached the end of its useful life. At that point, a new pair with a better matched heel pocket will serve you far better than more temporary fixes.